
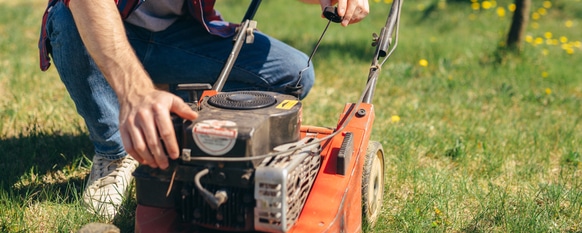
Lawn mowers are meant to be reliable machines.
Like clockwork, you start up it up every week or two and are able to proceed with mowing your lawn without any issues. But then, one day, you go out to fire up the engine, and it sputters for a moment and dies. You give it another shot. Still, nothing happens.
You might be inclined to take it to the repair shop and spend some of your hard-earned money having a small engine mechanic look it over. Perhaps you feel a little out of your depth trying to figure out what’s going on with your machine.
Before you open up your wallet, though, you need to read this article.
Here you’ll find the most common reasons why your lawn mower isn’t firing up and how to troubleshoot your problem.
If you found your way here, I bet you are also dealing with other issues on your property. For instance, a common problem is that your arborvitae may be turning brown. Learn why it is happening and how to resolve the issue.
Bad Gas
If there is gasoline in the engine, ask yourself how long it’s been since you cranked the engine up. If it’s been more than a month and it still has the same fuel in the tank, the gas may have deteriorated to the point where it won’t ignite.
If you believe that the gas may have become inert, drain the fuel tank and fill it with fresh petrol. If bad gas is the culprit, this should solve the problem.

Check for Leaks
You should also inspect the gas tank and fuel line to ensure that there aren’t any leaks. A tell-tale sign of a leak is your fuel being used up too quickly.
If you find that you have a leak, you’re going to wind up having to replace either the fuel line or the tank itself.
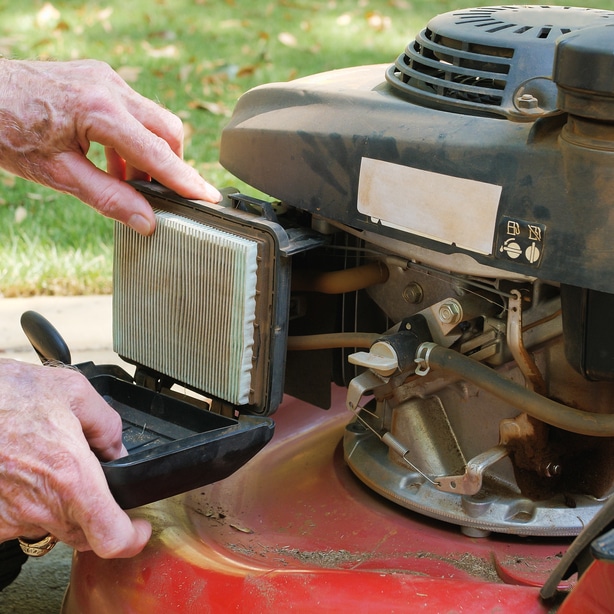
Air Filter
An air filter stops debris from entering the engine and affecting the air that mixes with the fuel. Over time, the debris will accumulate on the filter and impede the flow of the oxygen necessary for the combustion reaction that powers the engine.
The compartment for the air filter will be metal or plastic and be located near the engine. Open the compartment up, pull it out, and inspect it.
If you have a paper air filter, lift it towards the light. If you find that the light is not visible through large portions of it, it’s time to change it.
Other air filters are made of foam. These must be changed whenever large portions of it become stained with debris that accumulates over many mowing sessions.
Whether you are repositioning the old filter or installing a new one, you should always take time to clean its housing.
Pay special attention to the seat inside the compartment. This is where the air is directed once it passes through the filter.
Battery and Spark Plugs
Check the Spark Plug
If your spark plugs are compromised for any reason, there is no chance of your engine turning over. They could be worn out and require replacement, or they could have gotten wet.
Remove the spark plug wires and unscrew the plug. Inspect the spark plug for damage like cracks or burn marks. If you find evidence of damage, it’s a good idea to put in a new plug.
If you don’t notice any damage, spray it down with carburetor cleaner and clean it with a shop rag. Give it a little time to dry, and then reinsert the plug and reconnect the lead.
If the spark plug was the issue, the engine should start up.
After you get your machine working, you may want to learn how to mow patterns on your lawn – this not only is beautiful, but also serves a purpose in helping your grass grow healthier.
Check the Spark Plug Wire
A faulty lead wire can also leave your lawn mower inoperable. The only way to check the spark plug wire is to use a spark plug tester. And, if you’re not a mechanic, you probably don’t have one of these.
If you do, however, remove the spark plug and insert the tester into the lead. Then connect the other end of the tester to a functional spark plug.
Check the reading you get on the tester in the manual that came with it to determine whether there is a problem with the lead.
Test the Battery
While you’re checking the spark plugs, go ahead and check to see if your battery has any juice with a battery tester. If it’s dead, you can use a battery charger to give it some life. However, if the battery is older and worn out, it won’t hold the charge well and will need to be replaced.
Fuel Filter
The fuel filter, much like the air filter, is responsible for catching any foreign objects or debris contained in the fuel before it is combusted in the engine. There are a couple of issues that can arise from dirty or damaged fuel filters.
Dirty Fuel Filter
The first issue is caused by a dirty fuel filter that is saturated with foreign matter and debris. The debris can accumulate on the filter to the point that it impedes the steady flow of fuel to the engine. Your lawn mower engine may start if the filter is dirty, but the decreased fuel delivery will cause the engine to sputter and stall.
Damaged Fuel Filter
The second issue comes from fuel filters that are damaged. Debris can potentially get through the filter and into moving parts of the engine. Any foreign object that makes it beyond a compromised filter can wind up causing real damage to your engine. And it will probably be the kind of damage that will require a trip to the small engine repair shop.
Checking the Fuel Filter
You must inspect and your fuel filter at least every six months. Depending on the frequency of your mowing sessions and the size of your lawn, you will likely need to replace the fuel filter every year. While you could certainly push beyond a year, the potential harm it could cause to the engine isn’t worth the gamble. You’ll only wind up costing yourself a lot more money and trouble in the long run.
Refer to your owner’s manual to determine the location of your fuel filter and how to remove it. Your fuel filter may be located in a position that requires you to drain the gas tank or, at least, clamp the fuel line before you remove it.
The fuel filter will be attached to the engine with study clips that hold it in place. Locate these clips and unfasten them. Then proceed to remove the fuel filter for inspection.
As you’re looking it over, make sure the filter is not caked with debris and that it isn’t clogged anywhere. Ensure that none of the visible holes on the filter are torn or otherwise stretched out.

Fuel Flow Issues
If everything listed above is in working order, but you still cannot get the engine to turn on, then most likely, the issue is that the fuel in the tank is having trouble reaching the engine.
Before you start poking around in the engine, tap the carburetor with the handle of a screwdriver. This may clear the line of a clog and allow fuel to flow freely into the engine.
However, if you find that the carburetor is damaged or blocked, the fuel may not be flowing through it.
To check this, look at the top of the carburetor’s throat and find the choke plate. You should be able to move the choke plate readily by hand. If you find that it’s stuck, spray a small amount of carburetor cleaner (or WD-40 if you don’t have any carburetor cleaner on hand) down onto the shaft of the choke plate. This should loosen it up sufficiently to allow you to move it so that fuel flows through freely.
You should also check the engine (or the owner’s manual if you’re unsure where to look) to see if it is equipped with a fuel valve. If it is, you should remove that line and make sure that nothing is clogged inside of it. If you see a clog in the line, spray carburetor cleaner down into the line. The pressure from the aerosol will move the clog and cause it to spread out. Then the chemicals in the carburetor cleaner will break down the deposit further and allow fuel to flow through it once again readily.
Now you know the most common issues that lead to a lawn mower engine failing to start. Armed with this new information, you should always keep these things in mind whenever you go to do regular maintenance on your machine.
If you’re checking the oil, go ahead and check the filters and spark plugs while you’re at it. If the mowing season is coming to a close and you’re getting ready to put the your lawn mower up for the winter, don’t forget to drain the gasoline before you put it in your shed.
As with any lawn care practice, preventative maintenance is always your best line of defense.